摘要:日常学习中对一些知识点进行总结得出该系列文章。学习笔记内容包括前端技术,Django web开发技术,数据库技术如MySQL,MongoDB,PGSQL等等。此外还有一些工具如Dock,ES等等。(本文原创,转载必须注明出处.)
(1)查看python版本号:
1 | python -m django --version |
(2) 创建Django项目
1 | django-admin startproject mysite |
(3)测试开发服务器是否成功
1 | Desktop\bncDjango\mysite>python manage.py runserver |
(4)创建应用模块
1 | python manage.py startapp polls |
1 | # Application definition |
(5)polls模型下编辑视图view
1 | from django.shortcuts import render |
(6)polls模块下映射url
1 | from django.urls import path |
(7)mysite主模块下配置url
1 | from django.contrib import admin |
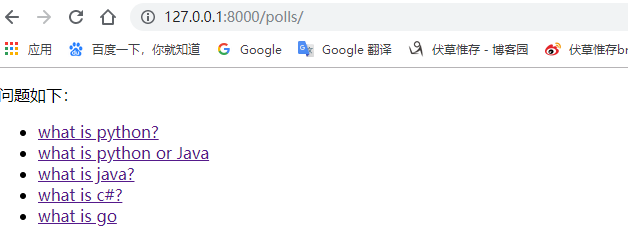
(8)网页查询http://localhost:8000/polls/

(9)数据库配置与迁移
1 | DATABASES = { |
1 | python manage.py migrate |
(10)编写模型M
1 | from django.db import models |
(11)激活模型
为模型的改变生成迁移文件1 | python manage.py makemigrations polls |

1 | python manage.py sqlmigrate polls 0001 |
1 | python manage.py migrate |
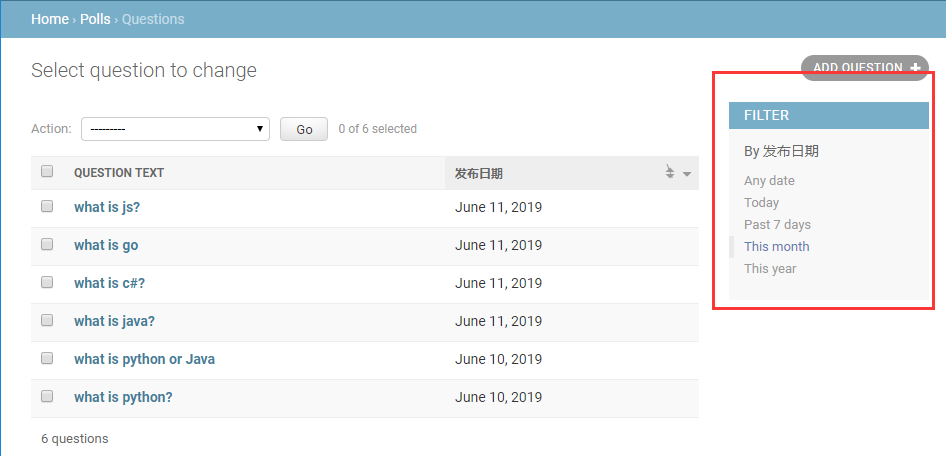
(12)全自动后台管理页面
12.1 创建一个能登录管理页面的用户,均为admin
1 | python manage.py createsuperuser |
12.2 启动开发服务器:
1 | python manage.py runserver |
http://127.0.0.1:8000/admin/login/?next=/admin/
12.3 进入站点
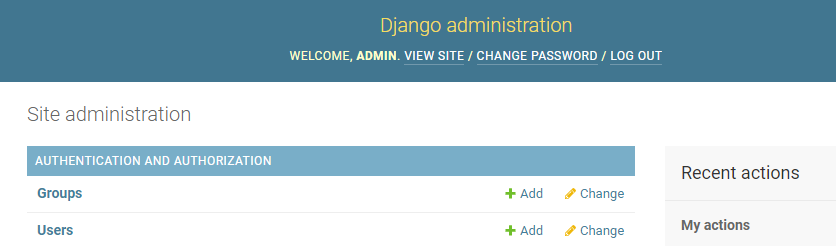
12.4 管理页面中加入配置应用
1 | from django.contrib import admin |
(13)编写更多视图
13.1 polls下的views
1 | from django.shortcuts import render |
13.2 polls下的urls记得添加命名空间
1 | from django.urls import path |
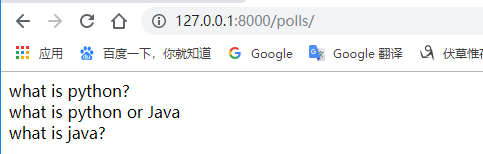
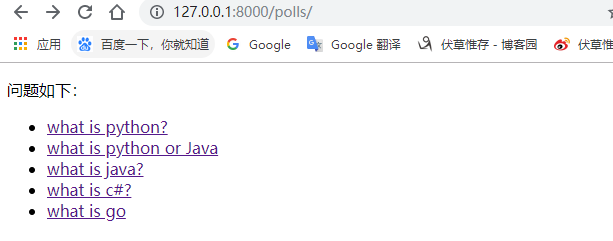
13.3 查询数据库信息并页面显示
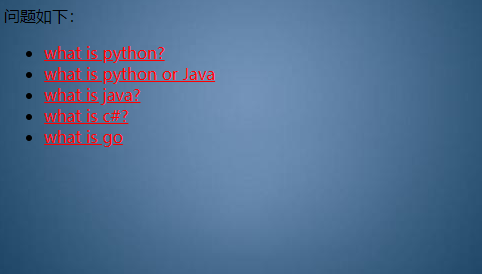
1 | # 问题索引页 |
(14)编写模板T
14.1 在mysite下创建templates,并创建polls文件夹下创建index.html
1 |
|
1 | <ul> |
1 | TEMPLATES = [ |
1 | from django.shortcuts import render |
1 | # 问题索引页 |
14.4 在浏览器访问 “/polls/“ 查看:
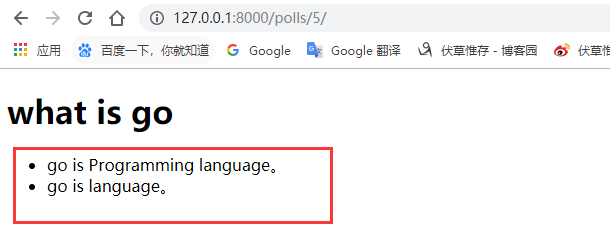
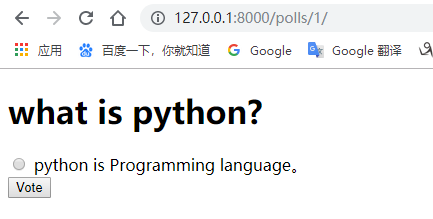
(15)查看详细页面
15.1 polls下views.py
1 | from django.http import Http404 |
1 | from django.shortcuts import render,get_object_or_404 |
15.2 template下detail.html
1 |
|
15.3 运行结果
(16)polls/detail.html详细页面添加一个表单form
1 | <body> |
- 每个单选按钮的
value属性是对应的各个 Choice 的 ID。每个单选按钮的name是"choice"。这意味着,当有人选择一个单选按钮并提交表单提交时,它将发送一个 POST 数据choice=#,其中# 为选择的 Choice 的 ID。这是 HTML 表单的基本概念。 - 我们设置表单的
action为 { % url “polls:vote” question.id %} ,并设置method="post"。使用 method=”post”是非常重要的,因为这个提交表单的行为会改变服务器端的数据。当你需要创建一个改变服务器端数据的表单时,请使用`method="post"。这不是 Django 的特定技巧;这是优秀的网站开发技巧。 - forloop.counter
指示 [for`](https://docs.djangoproject.com/zh-hans/2.2/ref/templates/builtins/#std:templatetag-for) 标签已经循环多少次。 - 由于我们创建一个 POST 表单(它具有修改数据的作用),所以我们需要小心跨站点请求伪造。 谢天谢地,你不必太过担心,因为 Django 已经拥有一个用来防御它的非常容易使用的系统。 简而言之,所有针对内部 URL 的 POST 表单都应该使用{ % csrf_token %}模板标签。
(17) polls/views.py 视图编辑
1 | # 投票处理器 |
request.POST是一个类字典对象,让你可以通过关键字的名字获取提交的数据。 这个例子中,request.POST['choice']以字符串形式返回选择的 Choice 的 ID。request.POST的值永远是字符串。- 如果在
request.POST['choice']数据中没有提供choice, POST 将引发一个KeyError。上面的代码检查KeyError,如果没有给出choice将重新显示 Question 表单和一个错误信息。 - 在增加 Choice 的得票数之后,代码返回一个
HttpResponseRedirect而不是常用的HttpResponse、HttpResponseRedirect只接收一个参数:用户将要被重定向的 URL。构造函数中使用reverse()函数。这个函数避免了我们在视图函数中硬编码 URL。重定向的 URL 将调用'results'视图来显示最终的页面。
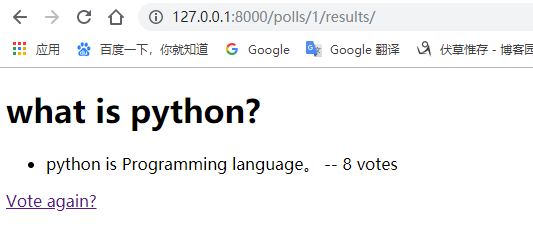
(18) 重定向results.html
1 | from django.shortcuts import get_object_or_404, render |
(19)通用视图,代码重构
19.1 detail() 视图几乎一模一样。唯一的不同是模板的名字。
1 | # 问题索引页 |
19.2 创建一个 polls/results.html 模板
1 | <h1>{{ question.question_text }}</h1> |
19.3 通用视图系统
通用视图将常见的模式抽象化,可以使你在编写应用时甚至不需要编写Python代码。将我们的投票应用转换成使用通用视图系统,这样我们可以删除许多我们的代码。我们仅仅需要做以下几步来完成转换,
- 转换 URLconf。
- 删除一些旧的、不再需要的视图。
- 基于 Django 的通用视图引入新的视图
1 改良URLconf
打开 polls/urls.py 这个 URLconf 并将它修改成:路径字符串中匹配模式的名称已经由 <question_id> 改为 <pk>。
1 | from django.urls import path |
2 改良视图
删除旧的 index, detail, 和 results 视图,并用 Django 的通用视图代替。打开 polls/views.py 文件,并将它修改成:
1 | from django.http import HttpResponseRedirect |
- 每个通用视图需要知道它将作用于哪个模型。 这由
model属性提供。 DetailView期望从 URL 中捕获名为"pk"的主键值,所以我们为通用视图把question_id改成pk。
19.4 运行程序
主页面
子页面
详情页面
(20)自动化测试
20.1 测试的策略
- 测试驱动:写代码之前先写测试。「测试驱动」的开发方法只是将问题的描述抽象为了 Python 的测试样例。
- 更普遍的情况是,一个刚接触自动化测试的新手更倾向于先写代码,然后再写测试。
- 如果你才写了几千行 Python 代码,选择从哪里开始写测试确实不怎么简单。如果是这种情况,那么在你下次修改代码(比如加新功能,或者修复 Bug)之前写个测试是比较合理且有效的。
20.2 第一个测试
需求:我们的要求是如果 Question 是在一天之内发布,was_published_recently()方法将会返回True,然而现在这个方法在Question的pub_date` 字段比当前时间还晚时也会返回 True
编写测试代码:
1 | from django.test import TestCase |
运行代码:$ python manage.py test polls
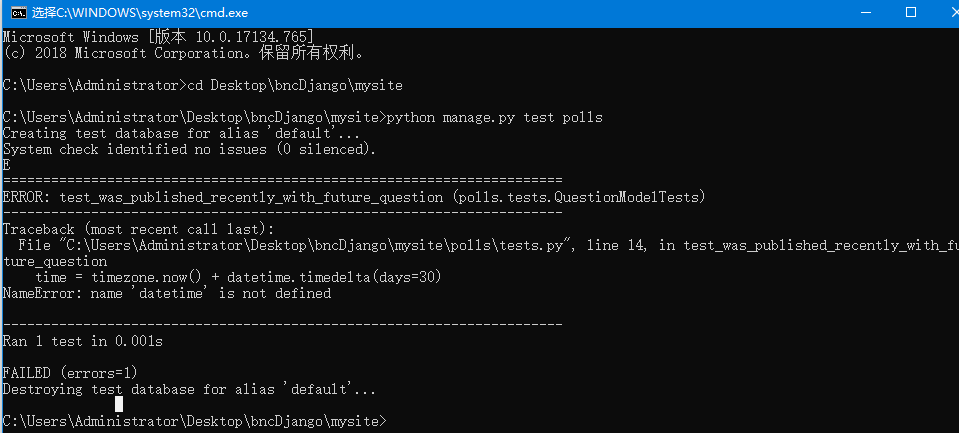
测试结果:
python manage.py test polls将会寻找polls应用里的测试代码- 它找到了
django.test.TestCase的一个子类 - 它创建一个特殊的数据库供测试使用
- 它在类中寻找测试方法——以
test开头的方法。 - 在
test_was_published_recently_with_future_question方法中,它创建了一个pub_date值为 30 天后的Question实例。 - 接着使用
assertls()方法,发现was_published_recently()返回了True,而我们期望它返回False。
(21)静态文件(图片/脚本/样式)
对于小项目来说,静态文件随便放在哪,只要服务程序能够找到它们就行。然而在大项目中,处理不同应用所需要的静态文件的工作就显得有点麻烦了。这就是 django.contrib.staticfiles 存在的意义
创建的 static 文件夹中创建 polls 的文件夹,再在 polls 文件夹中创建一个名为 style.css 的文件。样式表路径应是 polls/static/polls/style.css。因为 AppDirectoriesFinder 的存在,你可以在 Django 中简单地使用以 polls/style.css 的形式引用此文件,类似你引用模板路径的方式。
1 | li a { |
polls的index.html引用
1 | <head> |
添加图片
我们会创建一个用于存在图像的目录。在 polls/static/polls 目录下创建一个名为 images 的子目录。在这个目录中,放一张名为 background.gif 的图片。换言之,在目录 polls/static/polls/images/background.jpg 中放一张图片。
1 | body { |
更多关于设置和框架的资料,参考 静态文件解惑 和 静态文件指南。部署静态文件 介绍了如何在真实服务器上使用静态文件。
(22) 编写第一个django应用
22.1 polls/admin定义后台表单,列表为字段显示顺序
1 | from django.contrib import admin |
22.2 字段过滤器
1 | class QuestionAdmin(admin.ModelAdmin): |
22.3 自定义后台界面与风格
- 打开你的设置文件(
mysite/settings.py,牢记),在TEMPLATES设置中添加DIRS选项: - 在
templates目录内创建名为admin的目录,随后,将存放 Django 默认模板的目录(django/contrib/admin/templates)内的模板文件admin/base_site.html复制到这个目录内。Django 的源文件在哪里?$ python -c “import django; print(django.path)”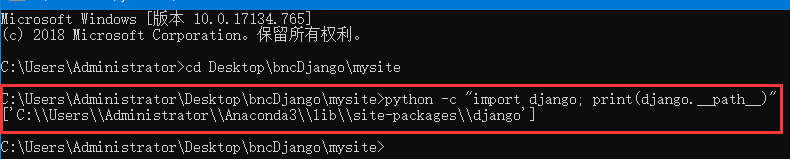
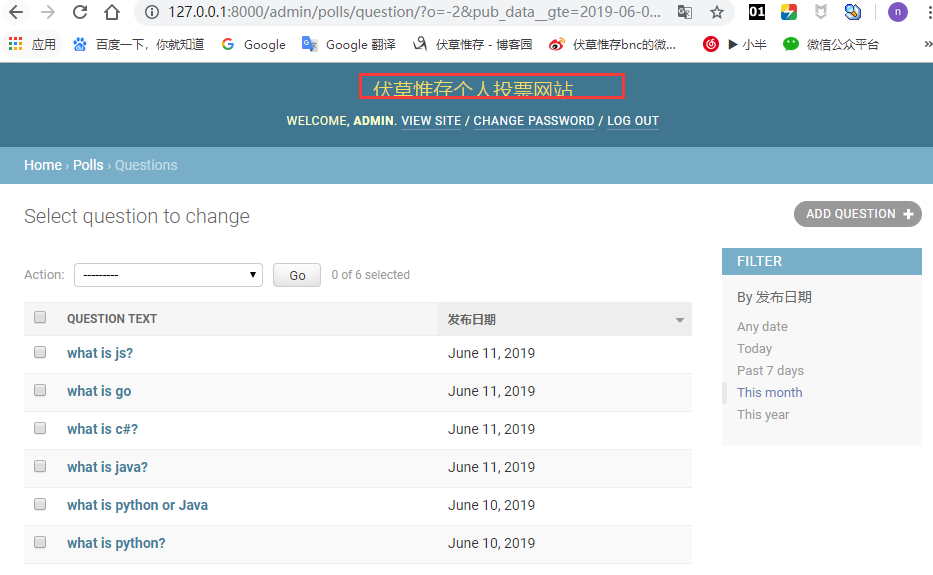
- 完成后,你应该看到如下代码:
1 | `{% block branding %}` |
技术交流共享QQ群
【机器学习和自然语言QQ群:436303759】:
机器学习和自然语言(QQ群号:436303759)是一个研究深度学习、机器学习、自然语言处理、数据挖掘、图像处理、目标检测、数据科学等AI相关领域的技术群。其宗旨是纯粹的AI技术圈子、绿色的交流环境。本群禁止有违背法律法规和道德的言谈举止。群成员备注格式:城市-自命名。微信订阅号:datathinks