摘要:日常学习中对一些知识点进行总结得出该系列文章。学习笔记内容包括前端技术,Django web开发技术,数据库技术如MySQL,MongoDB,PGSQL等等。此外还有一些工具如Dock,ES等等。(本文原创,转载必须注明出处.)
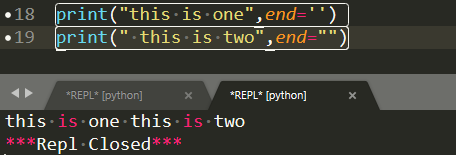
(1)print 默认输出是换行的,如果要实现不换行需要在变量末尾加上 end=””:
(2)isinstance 和 type 的区别在于:type()不会认为子类是一种父类类型。isinstance()会认为子类是一种父类类型。这么理解,父类:动物;子类:猫。isinstance()认为猫是动物,type()认为猫就是猫不是动物。
(3)数值的除法包含两个运算符:/ 返回一个浮点数,// 返回一个整数。
(4)Python 不支持单字符类型,单字符在 Python 中也是作为一个字符串使用。
(5)迭代器与生成器。
- 迭代是Python最强大的功能之一,是访问集合元素的一种方式。迭代器对象从集合的第一个元素开始访问,直到所有的元素被访问完结束。迭代器只能往前不会后退。迭代器有两个基本的方法:iter() 和 next()。把一个类作为一个迭代器使用需要在类中实现两个方法 iter() 与 next() 。
1 | class MyNumbers: |
- 在 Python 中,使用了 yield 的函数被称为生成器(generator)。生成器是一个返回迭代器的函数,只能用于迭代操作,更简单点理解生成器就是一个迭代器。每次遇到 yield 时函数会暂停并保存当前所有的运行信息,返回 yield 的值, 并在下一次执行 next() 方法时从当前位置继续运行。使用 yield 实现斐波那契数列:
1 | #!/usr/bin/python3 |
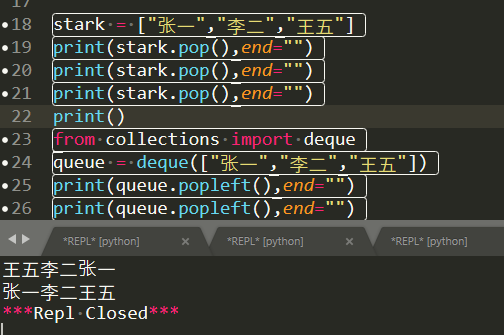
(6)列表的栈与队列
(7)将输出的值转成字符串,可以使用 repr() 或 str() 函数来实现。
- str(): 函数返回一个用户易读的表达形式。
- repr(): 产生一个解释器易读的表达形式。
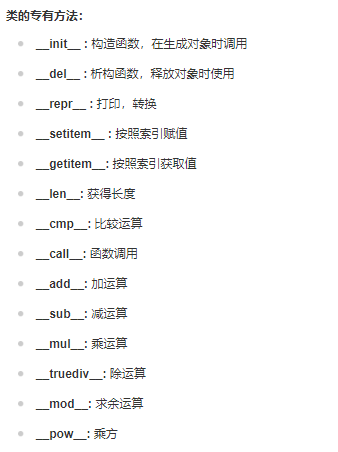
(8)类定义了 init() 方法,类的实例化操作会自动调用 init() 方法。类的方法与普通的函数只有一个特别的区别——它们必须有一个额外的第一个参数名称, 按照惯例它的名称是 self。与一般函数定义不同,类方法必须包含参数 self, 且为第一个参数,self 代表的是类的实例。self 的名字并不是规定死的,也可以使用 this,但是最好还是按照约定是用 self。
(9)__private_attrs:两个下划线开头,声明该属性为私有,不能在类的外部被使用或直接访问。在类内部的方法中使用时 self.__private_attrs。
(10)处理从 urls 接收数据的 urllib.request 以及用于发送电子邮件的 smtplib:
1 | from urllib.request import urlopen |
(11)doctest扫描模块并根据程序中内嵌的文档字符串执行测试。通过用户提供的例子,它强化了文档,允许 doctest 模块确认代码的结果是否与文档一致:
1 | def average(values): |
(12)Python实例总结 https://www.runoob.com/python3/python3-examples.html
(13)Python实现查找与排序:https://www.runoob.com/python3/python3-examples.html
(14)re.match 尝试从字符串的起始位置匹配一个模式,如果不是起始位置匹配成功的话,match()就返回none。flags是否区分大小写。
1 | re.match(pattern, string, flags=0) |
(15)re.match与re.search的区别。re.match只匹配字符串的开始,如果字符串开始不符合正则表达式,则匹配失败,函数返回None;而re.search匹配整个字符串,直到找到一个匹配。
(16)Python连接MySQL
1 | import MySQLdb |
(17) 格式化日期:
1 | #!/usr/bin/python3 |
(18)Python操作MongoDB
- 启动服务
1 | D:\mongodb\bin>mongod --dbpath D:\mongodb\data\db --logpath=D:\mongodb\log\mongo.log --logappend |
- MongoDB
1 |
|
(19)WSGI 应用和常见的 Web 框架
- 部署Django
1 | [uwsgi] |
1 | uwsgi yourfile.ini |
- 部署Flask
创建文件 myflaskapp.py ,代码如下:
1 | from flask import Flask |
执行以下命令:
1 | uwsgi --socket 127.0.0.1:3031 --wsgi-file myflaskapp.py --callable app --processes 4 --threads 2 --stats 127.0.0.1:9191 |
技术交流共享QQ群
【机器学习和自然语言QQ群:436303759】:
机器学习和自然语言(QQ群号:436303759)是一个研究深度学习、机器学习、自然语言处理、数据挖掘、图像处理、目标检测、数据科学等AI相关领域的技术群。其宗旨是纯粹的AI技术圈子、绿色的交流环境。本群禁止有违背法律法规和道德的言谈举止。群成员备注格式:城市-自命名。微信订阅号:datathinks